To Android users, especially advanced ones, rooting their
phones or tablets is becoming a necessity. Rooting Android could be
complicated, if you do it all by yourself, even with a step-by-step
tutorial. However, what Kingo Android Root offers you is a true one-click experience when rooting your Android.
What Is Android Rooting?
Android Rooting,
in a nutshell, is a modification process to the original system in
which the limitations are removed and full-access is allowed, thus
resulting in the ability to alter or replace system applications and
settings, run specialized apps, and even facilitate the removal and
replacement of the device's operating system with a custom one.
What Can You Do After Rooting Your Android?
After
rooting, you can install a custom ROM and recovery, customize your
system with beautiful themes and fonts, increase internal memory by
moving all of your apps to an SD card, increase your RAM, overclock and
undervolt your device, hack games, remove bloatware, install fantastic
root-only apps like Titanium Backup, Greenify, AdAway, and such.
Pros & Cons of Android Rooting
Pros:
Basically, the benefits that rooting your Android device can offer are
all about acquiring high-level permissions with which you could overcome
all limitations and do modifications as you like.
Cons: Rooting immediately voids your phone's warranty. Rooting involves the risk of “bricking” your phone.
How to Root Your Android Devices in One Click?
Using Kingo Android Root is extremely simple, but I'll elaborate it down to every little detail, so please bear with me.
You can see the list of devices that Kingo supports here.
The
list is incomplete and not up-to-date, it does not necessarily mean
not-support if your device is not in the list. If you have any doubt
about your device being support, feel free to contact.
Step 1: Check These Prerequisites
A Windows-based computer with Internet access.
USB cable; the original one is recommended.
Device powered on with at least 50% battery level.
Step 2: Install & Launch Kingo
Kingo Android Root is a free download that is available here.
After installing it on your computer, double-click the icon on your
desktop to launch it—you will see an interface as shown below.
Step 3: Manually Enable USB Debugging Mode on Your Android
Although the very aim of Kingo Android Root is to offer a true one-click rooting experience, this step falls on users.
USB debugging mode
is a developer option to facilitate a connection between an Android
device and a computer with Android SDK (software development kit), which
is usually hidden in Android 4.2.X and higher versions.
How to Enable USB Debugging Mode on Android?
Android 2.0 - 2.3.X
Go to Settings -> Applications -> Development -> USB debugging.
Android 3.0 - 4.1.X
Go to Settings -> Developer Options -> USB debugging.
Android 4.2.X and higher, including Android 5.0 Lollipop
Go to App Drawer -> Settings -> About Phone -> Build number.
Then, tap the Build number 7 times to become developer. Afterward, go to Settings -> Developer options -> USB debugging.
More info on how to enable USB debugging mode can be found here.
Step 4: Connect Your Android Device to PC via USB Cable
There will be a prompt window that appears on your device's screen. Click "OK" to allow USB debugging from your computer.
Kingo will automatically install the device driver (if it is not
installed already), recognize your device model, and show the root
status of your device.
Step 5: Click "ROOT" When You Are Ready to Go
Please
read the notifications carefully and be fully aware of its advantages
and disadvantages before you proceed. It will take a few minutes for
Kingo to run its course.
Step 6: Root Succeeded & Click "Finish" to Reboot
Kingo
has rooted millions of Android devices from almost all manufacturers
and carriers. The general method that Kingo employs during rooting is an
exploit (or vulnerability) of Android firmware.
Theoretically, it
should not cause data loss, but bad things happen, and Kingo is not
responsible for any damage. We will exert every effort to make this
software safe and easy to use. As to device support, we are trying to
cover every brand and every firmware version, but it is impossible to
cover it all, and those vulnerabilities we rely on to root your device
will be patched by authorities in later firmware.
Kingo Android Root Also Has "Remove Root Function" Built-In
Kingo
has built-in "Remove Root" function as well. Connect your device to
your computer via your USB cable and grant "Superuser Request" for an
ADB shell on your device.
After your device is recognized by Kingo, you should see your Root
Status as "YES" with the "Remove Root" button on the interface. Just
click it and wait.
A huge chunk of my life revolves around my computer, and whenever I'm on
my laptop and get a text message notification on my phone, I find it
extremely distracting to stop whatever I'm doing to hunt it down. That's
why I'm a big fan of text messaging via my computer.
Thankfully, a new
app has fixed what KitKat broke and allowed for full-featured texting
from my laptop once again. Today, I'll show you how to text from your
computer so that you never have to fumble around for your phone again
while your working or lurking on Facebook.
Step 1: Install EndlessJabber SMS on Your Phone
The app will be using is called EndlessJabber SMS by MariusSoft LLC,
which is available in the Google Play Store. It syncs directly to your
Android device's phone number so that you can remotely receive and sent
text message from within any web browser—on a computer or a tablet.
Step 2: Set Up EndlessJabber SMS on Your Phone
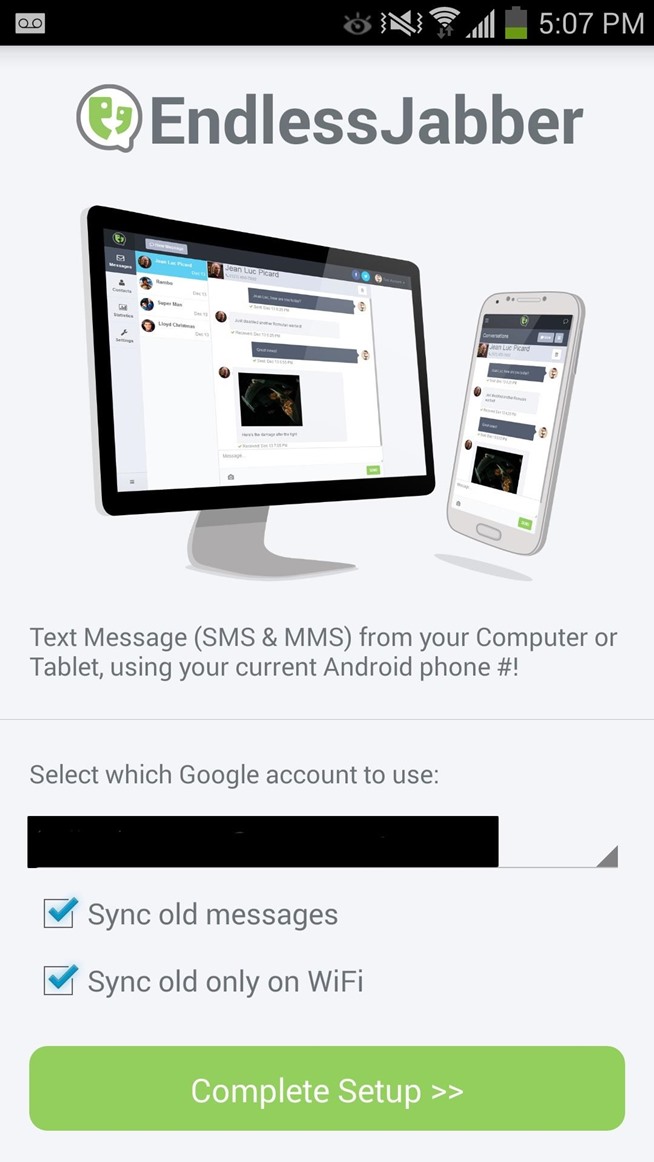
Launch the Endless Jabber app, then tap the button for Complete Setup, and make sure to leave Sync old messages and Sync old only on WiFi checked.
You only need to install this app on your phone. If you plan on using your tablet to send text messages from, see the next step.
Step 3: Set Up EndlessJabber on Your Computer & Tablet
If you use Google Chrome on your desktop, you can install the EndlessJabber extension from the Chrome Web Store, which will allow new messages to appear as browser notification popups. There is also an EndlessJabber add-on for Mozilla Firefox.
The above browser extensions work in conjunction with the EndlessJabber web interface, so if you want to reply to a message popup, you'll be directed there.
If
you're using another web browser on your computer, like Internet
Explorer, Safari, or Opera, just bookmark the web interface so you can
view and send text messages whenever you want. You can even use the
mobile browser on your Android (or even iOS) tablet. Just make sure to
bookmark the webpage for easy access.
Step 4: Install EvolveSMS on Your Phone (Optional)
While your stock messaging app should work just fine, EndlessJabber has worked closely with EvolveSMS
to bring many features to the service, like deleting, marking as read,
and saving picture messages. While receiving and sending will work just
fine with any SMS app, it's recommended that you use Evolve for a better
experience.
Step 5: Receive & Send Texts from Your Computer
Navigate to the web UI
from any device with a web browser to see your SMS texts. To carry on a
conversation, just type your message in the "Message..." box and hit
the Send button. To start a new message, hit the New Message button up top.
EndlessJabber also has support for multiple phones, so if you have
other phone numbers connected to the service, you can switch between
them and send text messages from whichever phone you choose.
There are no other settings to configure at this point. You'll
automatically see old and new messages synced over from your Android
phone in the web UI, including your contact list, and any picture
messages you have received.
Useful data and stats such as the number of daily texts and your most messaged recipients can also be found by selecting Statistics from the sidebar.
Now, you'll never have to reach for your phone again when you're in
front of your computer. This is very useful for all the productivity
nuts out there who are glued to their computer screen like I am.
Want to search through your Samsung Galaxy S III or other Android smartphone using only a web browser? Thanks to XDA-Developers member Metal Droid, you can now access and download anything from your phone through any browser on your computer using DroidXPlorer.
With DroidXPlorer,
you can just push a button in the application and search through your
phone using a web browser, such as Internet Explorer or Google Chrome.
From the web browser, you can choose to not only download files, but
also stream video and audio.
If you're worried about someone else sneaking in to your phone, just go to Settings and activate password protection.
The application only works if both the Android phone and computer are connected to the same Wi-Fi network.




 Posts
Posts

